|

Aster Reporter Installation
First you need download all files, so go to download section, and get the next package:
- aster-version-libs.zip
- aster-reporter-version.zip
The first package contains all the required libs. The second package contains the war file of the reporter and the SQL script for MySQL, PostgreSQL.
Now that you have all the needed packages, go to install.
Download tomcat 5.x from tomcat.apache.org and uncompress in some dir, for example /usr/local. Now, uncompress aster-x-lib.zip somewhere, and copy all files from generated directory to TOMCAT_HOME/common/lib.
Uncompress aster-reporter-x.zip, this action generates the aster-reporter directory, inside you have the war file, and the SQL script fro MySQL, PostgreSQL.
Now, you need to adjust some DataSource configuration option, so, uncompress the file context/WEB-INF/databaseContext.xml from simbel-reporter-x.war:
| $ unzip simbel-reporter-x.war context/WEB-INF/databaseContext.xml |
and go to the line <bean id="dataSource" class="org.springframework.jndi.JndiObjectFactoryBean">, in the node <property name="jndiName" you can see 3 options commenteds for the 3 servers (jboss, tomcat and weblogic), so, uncomment the line for tomcat, and comment the other 2 lines. In this step you adjust the tomcat jndi name for the jndi tomcat specific naming directory.
Now put the file in simbel-reporter-x.war again:
| $ zip simbel-reporter-x.war context/WEB-INF/databaseContext.xml |
Now, the SQL schema:
Now, we go to add datasource configuration; go to http://localhost:8080/admin and enter in the administration console. Navigate to your application context (Tomcat Server > Service > Host > Context (simbel-reporter) > Resources > Data Sources) and add new DataSource configuration:
Save the datasource configuration and apply the changes.
Now, you must deploy the war file on container. Just copy aster-report.war to TOMCAT_HOME/webapps and start tomcat. To test the application go to your browser and type http://localhost:8080/simbel-reporter on address bar.
Download jboss 3.2.x from jboss.org and uncompress somewhere, by exmaple /usr/local.
Now, uncompress aster-x-lib.zip somewhere, and copy all files from generated directory to JBOSS_HOME/server/default/lib.
Uncompress aster-reporter-x.zip, this action generates the aster-reporter directory, inside you have the war file, and the SQL script fro MySQL, PostgreSQL.
Now, you need to adjust some DataSource configuration option, so, uncompress the file context/WEB-INF/databaseContext.xml from simbel-reporter-x.war:
| $ unzip simbel-reporter-x.war context/WEB-INF/databaseContext.xml |
and go to the line <bean id="dataSource" class="org.springframework.jndi.JndiObjectFactoryBean">, in the node <property name="jndiName" you can see 3 options commenteds for the 3 servers (jboss, tomcat and weblogic), so, uncomment the line for jboss, and comment the other 2 lines. In this step you adjust the tomcat jndi name for the jndi jboss specific naming directory.
Now put the file in simbel-reporter-x.war again:
| $ zip simbel-reporter-x.war context/WEB-INF/databaseContext.xml |
Now, the SQL schema:
- MySQL Schema Installation.
- PostgreSQL Schema Installation.
Only need to create a DataSource configuration. go to JBOSS_HOME/server/default/deploy and create a text file named astert-reporter-ds.xml
$ cd $JBOSS_HOME/server/default/deploy $vi aster-reporter-ds.xml |
... and add the nexte entries and adjust the values for the host, database name, username, and password
<datasources>
<local-tx-datasource>
<jndi-name>jdbc/simbel-reporter</jndi-name>
<connection-url>jdbc:postgresql://localhost/aster</connection-url>
<!--connection-url>jdbc:mysql://bdata/simbelreporter</connection-url-->
<!--connection-url>jdbc:oracle:thin:@132.248.124.171:1521:prueba</connection-url-->
<!--driver-class>org.gjt.mm.mysql.Driver</driver-class-->
<driver-class>org.postgresql.Driver</driver-class>
<!--driver-class>oracle.jdbc.driver.OracleDriver</driver-class-->
<user-name>aster</user-name>
<password>aster</password>
<new-connection-sql>select count(*) from SIMBEL_CONFIG</new-connection-sql>
<check-valid-connection-sql>SELECT count(*) FROM SIMBEL_CONFIG</check-valid-connection-sql>
<min-pool-size>2</min-pool-size>
</local-tx-datasource>
</datasources>
and save the file.
Now, you must deploy the war file on container. Just copy aster-report.war to JBOSS_HOME/server/default/deploy and start jboss. To test the application go to your browser and type http://localhost:8080/simbel-reporter on address bar.
Now, uncompress aster-x-lib.zip somewhere, and copy all files from generated directory to DOMAIN_HOME/lib. Remember, Weblogic creates a directory for each domain.
Uncompress aster-reporter-x.zip, this action generates the aster-reporter directory, inside you have the war file, and the SQL script fro MySQL, PostgreSQL.
Now, you need to adjust some DataSource configuration option, so, uncompress the file context/WEB-INF/databaseContext.xml from simbel-reporter-x.war:
| $ unzip simbel-reporter-x.war context/WEB-INF/databaseContext.xml |
and go to the line <bean id="dataSource" class="org.springframework.jndi.JndiObjectFactoryBean">, in the node <property name="jndiName" you can see 3 options commenteds for the 3 servers (jboss, tomcat and weblogic), so, uncomment the line for weblogic, and comment the other 2 lines. In this step you adjust the tomcat jndi name for the jndi jboss specific naming directory.
Now put the file in simbel-reporter-x.war again:
| $ zip simbel-reporter-x.war context/WEB-INF/databaseContext.xml |
Now, the SQL schema:
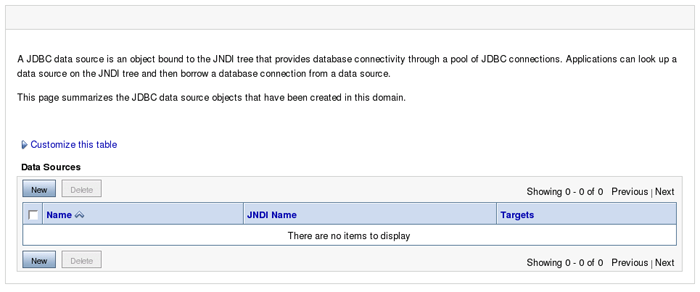
Ok, now go to weblogic administration console and lets to add the datasource. Open your browser, and go to http://localhost:7001/console (this port may be different), and login. Once you logged in, go to Services > JDBC > Data Sources and click in "new" button.

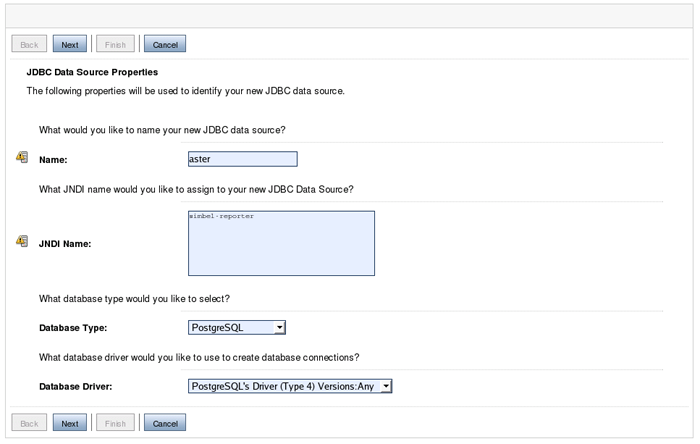
In the next screen, type the datasource name (may be aster) or use an existent datasource (recommended), type the JNDI name (simbel-reporter) the database type (in this example we user PostgreSQL) and the database Driver.

The next screen you can leave the default's values.

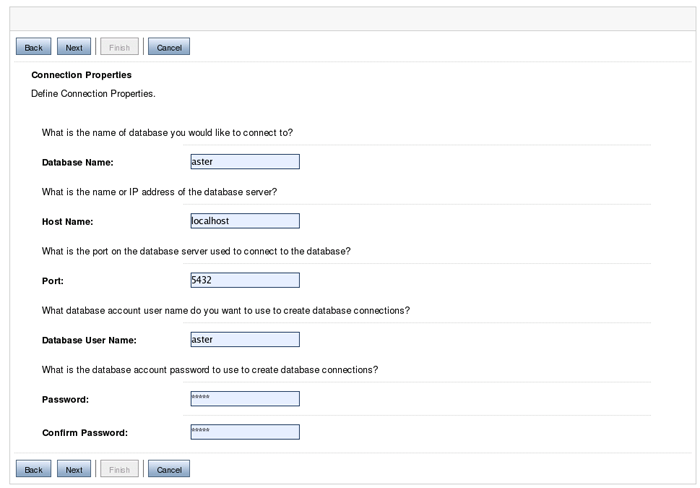
Now, we give the database params:
| Database Name | aster |
| Host Name | localhost |
| Port | 5432 (for postgresql) |
| Database username | aster |
| Database password | aster |

In the next screen just confirm the values and test your connection (remember add the database driver in DOMAIN/lib). Now give the target servers for this datasource, in standard installations, just have one weblogic server.

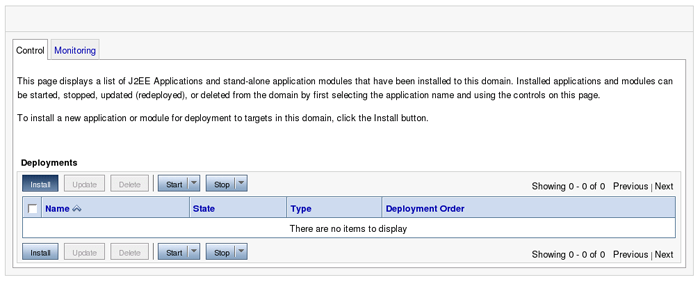
Once you install the datasource, lets go to war deployment. Go to deployments menu, and click in "new" button to upload the war.

In the next screen you can upload the war file, just click un browse button in "deployment archive" input text, navigate to the war location, and upload it.

In the next screen you can confirm the war (simbel-reporter.war), just click "next" button.

Now select the "Install this deployment as an application" option, and click "next".

In the next screen leave the default's values, and click next. Once you apply the changes, you can start the application.

Click in Start > Servicing all request to start this application, in the next screen just confirm this step and apply changes.
Thats all, go to your browser and go to http://localhost:7001/simbel-reporter
You no need to create a database for aster reporter, becouse you have a database for the reports, by example, i have a database for the users of any system, so, i add the reporter schema over this existent schema, so, only i login into my users database:
$ mysql -Udbuser -hdbhost employee_db mysql> source /path/to/schema-mysql.sql mysql>INSERT INTO simbel_user VALUES('admin','Administrator','','true,'mail@mail.com'); |
In the first step add the aster schema to an existent database schema and add an administrator account.
You no need to create a database for aster reporter, becouse you have a database for the reports, by example, i have a database for the users of any system, so, i add the reporter schema over this existent schema, so, only i login into my users database:
$ psql -Udbuser -hdbhost employee_db employee_db=> \i /path/to/schema-mysql.sql employee_db>INSERT INTO simbel_user VALUES('admin','Administrator','','true,'mail@mail.com'); |
In the first step add the aster schema to an existent database schema and add an administrator account.